Organization and setting up your SLP toolbox is important for streamlining your therapy!
You’ve read all about how and why I use cycles in speech therapy. You’re ready to get started! But, you want to do it in an organized way?
You’re not alone! I get emails almost every day asking for tips and tricks for storing my Cycles for Phonology Toolkit. While many of you have assembled it used the recommended toolbox, it isn’t a perfect system for all SLPs.
In this post, I’m going to share 7 different storage systems. There are way more options than this so great creative!
Disclosure: This post contains affiliate links that may earn me a small commission, at no additional cost to you. I only recommend products I personally use and love, or think others will find useful.
 SLP Toolbox
Even though this isn’t an alternative option, I wanted to include it here so that you had access to everything in one place. I use this system because I think it looks great in my room, keeps everything organized, is grab and go, and my students can find their cards on their own. I have the assessment printables, parent forms, norms, and other printables in a binder as well.
I purchased this toolbox on Amazon (linked below), however I know other SLPs have found it at home improvement stores like Lowe’s.
 Photo Storage Box
These photo storage boxes are brilliant and will transform your toolkit into something you can carry from place to place. Portable SLP toolbox win! Another benefit of this system is that the smaller, individual photo boxes can be used and packed themselves.

As you can see, you can fit multiple decks into one box and two of the toolbox labels fit onto each side.
I use these photo storage boxes for everything. You can find them on Amazon or at craft stores like Joann Fabrics or Michaels.
 Binder
Who says an SLP toolbox has to be in a box? Putting everything into a binder is another great storage system. This way, you can keep everything in one place.

I use tabs to keep the parent forms, assessments, and other forms separated. You can use playing card protectors in the binder to store the flashcards. They fit perfectly, even when laminated!
I found both this binder and the pocket pages at Target, however they are also available on Amazon. The binder I used is 1.5 inches.
Playing Card Portfolio
These playing card portfolios are a great, portable way to store your flashcards. Because you can’t insert full pages in one of these, this isn’t a great storage idea for the assessments and other forms, however it is so small and easy to pack! I got this one at Target, but they are also available by clicking here on Amazon.

You can attach the cover directly to the front of the portfolio so it even looks pretty nice! The inside looks like the picture below. Each pocket can fit multiple cards so you can even store several copies (black & white) behind the front one.

Mailboxes
This photo was shared by another SLP! I love this system because it can store everything in one place! You can keep full sheet black and white cards in the slots as well as assessment forms.
Jewelry Holders
I don’t have a photo of this system but have heard positive things from other SLPs. They use a clear, jewelry holder (like the one linked below) and store the cards on their door or against the wall in their room. I love this idea and think it would save a ton of space!

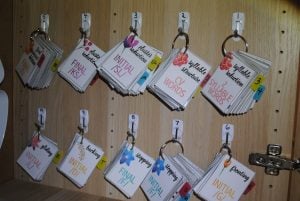
Wall Hooks
A wonderful Instagram follower sent me this photo and I absolutely loved it! How clever! Just buy wall safe adhesive hooks, attach, and go! Something like what is linked below on Amazon would probably work well.
Another wonderful SLP emailed me with the same idea, shown below:

I hope that helps give you some new ideas for storing your cycles toolkit! Also, if you have a different way you’re storing the toolkit, let me know! I’d love to share out your way because maybe it’ll be the perfect solution for another SLP!
If you want to check out my Cycles for Phonology Toolkit, click here to see it in my TpT store!
Thanks so much for reading!
 Photo Storage Box
 Binder


I love all of the different storage options! I currently have them stored in the toolbox, but I might also create a binder + playing card sheets for when I travel to my PS students!
Shannon, I am absolutely not crafty and I cannot figure out how your labels look so professional on the covers of the photo storage boxes, my labels are covered in packing tape and it doesn’t look nearly as pretty as yours. Do you print labels on sticky back paper?
Hi! I printed them on regular paper and laminated them! And then used sticky tack or double sided permanent tape to attach them! Hope that helps!
Hi!
I am finally getting around to cutting all these cards and can’t wait to get everything set up. Can you tell me if you just put all the cards in one stack (ie, gliding initial /l/) or do you divide them into “sets” like your lists show?
Thanks!!
I have seen people do both – put them all in one stack or divide them up. You really only need to tackle a handful of words each session and try to get lots of repetitions of those words, but you can store them however it makes sense to you!
PS…are the cards at the end extras? Did you just add them to the stacks with the same sounds?
The cards at the end are additional cards with simpler, more common words if you or your students were struggling with some of the earlier words. These could each be their own set, or added to the stack. As a general rule, I only target 5 words per session and try to get 100+ productions of those 5 target words!